 |
| Sprout Jar Wooden Rack with Jars |
Growing your own sprouts at home is a rather simple project that can provide excellent nutrients at a very reasonable cost compared to purchasing them in your local grocery store. In addition, it is a very compact way to store food in case of an emergency.
What you will need in order to grow your own sprouts:
- A jar in which to grow them. A standard wide-mouth quart size canning jar is what I use.
- You will need to have a piece of mesh cloth that will enable you to drain off the water from the seeds as you rinse them each day. I didn't have any lying around the house, so I ordered mine online.
- You will also need to have a way to keep your jars upside down so they can completely drain, and have some air flow to the sprouts. My very talented husband made a wooden rack for me that holds up to 3 Mason jars and folds flat for storage. You can purchase one from our Marketplace if you wish.
- Then, you will need to have sprouting seeds. I found mine online.
 |
| Canning jar, mesh cloth, and metal ring |
 |
| Folding Wooden Rack |
Okay, now that you have everything you need to grow your own sprouts, here is how to begin:
- Place about 3 tablespoons of sprout seeds into a clean quart size wide-mouth canning jar (makes it easier to remove the sprouts).
- Cover with mesh cloth and tighten ring.
- Rinse seeds with lukewarm water a couple times, then fill jar about one-half full with lukewarm water and soak seeds for around 24 hours.
 |
| Soaking the sprout seeds on day 1 |
- On day 2, drain water from seeds and rinse again with lukewarm water.
- Place jar upside down to finish draining, and just leave it alone. You will want to place a small container under the jar to catch excess water as it drains, or a folded paper towel would work also.
 |
| Growing sprouts day 2 |
- You will need to rinse the seeds/sprouts twice a day with lukewarm water for 5 to 6 days after day one of soaking, or until your jar is as full as desired. I have successfully grown sprouts with only one rinse per day, so if you're really busy one day, or just simply forget, no worries, they'll be fine.
 |
| Growing sprouts day 3 |
You can see here that the sprouts are about 1/4 of an inch long already. In just a few days the jar will be full. Amazing! Your seeds, grains, and legumes are easier to digest after they have been sprouted. In addition, your digestive system will be able to assimilate nutrients much more easily.
 |
| Growing sprouts day 4 |
Today the sprouts are about 3/4 of an inch long, and filling up the jar nicely. Sprouts are low in calories, and loaded with protein, Vitamin C, and contain a variety of B Vitamins.
 |
| Growing sprouts day 5 |
You see how the sprouts are beginning to look green? They're almost there! Be careful not to let the jar get too full, you will have difficulty removing the sprouts, or worse yet, they could break the jar! Sprouts also contain zinc, niacin, riboflavin, copper and magnesium, which are all excellent for hair, and they are loaded with antioxidants.
 |
| Growing sprouts day 6 |
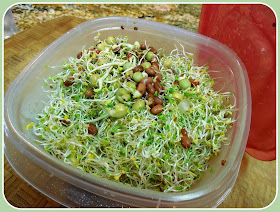
When your jar is full, remove sprouts from jar into a large bowl. Rinse the sprouts with cool water several times to remove seed hulls. The hulls will both float to the top and sink to the bottom. Just skim off the hulls that float to the top, then gently lift out the sprouts from the rinse water, leaving the remaining hulls in the bottom of the bowl. I use a slotted spoon to get every last little sprout when I get to the bottom of the rinse bowl. It's not important to get all the hulls, just most of them. Drain them well and store in a tightly sealed container in refrigerator and enjoy!
 |
| Rinsing sprouts |
 |
| Rinsed sprouts, ready to store! |
Sprouts are wonderful on sandwiches, in salads or soups, as a filling for your taco or tortilla, in stir fry, as a pizza topping, in homemade breads, or just by themselves as a quick snack. They're crisp, tasty, crunchy and extremely high in vitamins and minerals. The mix I used in this post consists of adzuki, green pea, broccoli, clover, and alfalfa seeds. Of course, you can use any combination you like, or choose just one.
 |
| Eating sprouts! |
Okay, it doesn't look quite as good as it tastes. I mixed a couple spoonfuls of Greek yogurt into about a half batch of sprouts and seasoned with a touch of salt and pepper. Added some deviled egg salad (the eggs were from our very own chickens) and a few whole grain crackers. Mmmm, a delicious and healthy lunch!
Carpe Diem! Lil and Bill


Is there directions on making the wood drainngnrack
ReplyDeleteThank you for asking, however, the only directions for this one are hidden within the mind of my very handy and talented husband! You can find very inexpensive bamboo dish drain racks that will work beautifully, such as this one: https://www.amazon.com/Bellemain-Folding-Bamboo-Dish-Drying/dp/B07H9D51ZP/ref=sr_1_6?ie=UTF8&qid=1550516396&sr=8-6&keywords=bamboo+dish+drying+rack
Delete